About this site

Welcome! I created this site to share what we've done, talk about what we plan to do, and exchange ideas with other folks who are on the same path as us. Join us in the fun of living at Chickaree Hill Farm!

Thursday, December 22, 2011

Cranberry Baklava

This recipe is amazing!  I had never tried to use phyllo dough before, but when I saw this recipe I knew I had to try it.  It is very straightforward although it does take a little time ... but it is so worth it!  You will be so impressed with the result, as will everyone who tastes it!

I found the original recipe on allrecipes.com but with my modifications it is perfect!!!  It is a great recipe for the holidays ... the cranberries really make it festive and special.

Cranberry Baklava

1 16-oz. pkg phyllo dough
1 cup butter, melted
1 12-oz. pkg cranberries, finely chopped
2 6-oz. pkgs pecans, finely chopped
3/4 c. white sugar
1 t cinnamon
1/4 t allspice
1/8 t ground cloves
1/8 t nutmeg
1.5 c. honey

Directions:

  1. Preheat oven to 325 degrees.  Grease a 13"x9" baking dish.  
  2. In a large bowl, mix together the cranberries, pecans, sugar, cinnamon, allspice, cloves, and nutmeg.
  3. Trim phyllo dough to fit pan.  Layer 5 sheets of phyllo dough in dish, brushing each with melted butter.    [I find that phyllo dough is pretty forgiving ... if you rip a piece, simply use the melted butter to "paste" it together.  Since it is layered, a tear won't make much difference.  If the tear is in the same place on multiple sheets, try to move the ripped place by rotating the sheet on each layer so that the ripped spot doesn't go all the way through the layer.]
  4. Spread 1.5 cups of cranberry mixture over the phyllo dough.  Repeat so that you have 4 layers of phyllo dough and 3 layers of cranberry mixture.
  5. Using a sharp knife, cut halfway through the layers to make 24 pieces (triangular shaped pieces are the traditional way to cut baklava).  
  6. Bake for 60-70 minutes or until golden brown.
  7. Heat honey until it is warm and thin.  Pour evenly over the warm baklava.  Cool on wire rack for one hour.  
Baklava after cutting but before baking.
It will turn golden brown in the oven.

Baklava tastes best when it has had time to really sit and absorb the honey, so it is a great candidate to make in advance of an event or holiday.

A note about the phyllo dough - the brand name that I buy is called Athens.  The original recipe called for 6 sheets per layer, but the Athens package did not come with enough sheets.  Rather than open another package, I have found that 5 sheets work fine.  However, if your brand has enough for 6 sheets per layer, then use that.

Enjoy!

Saturday, November 26, 2011

Blue Cheese Cole Slaw


Got this recipe from my mother-in-law ... it is delicious!  A great variation on an old favorite.

For crisp slaw, first soak the shredded cabbage in ice water for an hour.  Then drain the cabbage, pat dry, and store in the refrigerator in a plastic bag until ready to use.

3T apple cider vinegar
2T finely chopped onion
1T sugar
¾ t celery seeds
¼ t salt
¼ t pepper
1/8 t dry mustard
1 clove garlic, minced
¼ cup vegetable oil
1 lb. cabbage, finely shredded
1 4-oz. pkg crumbled blue cheese

Combine first 8 ingredients in a small bowl add oil in a slow, steady stream, stirring constantly with a wire whisk until mixture is blended.  Cover and chill at least 1 hour.  Combine cabbage and blue cheese; cover and chill 1 hour.  Drizzle vinegar mixture over cabbage mixture; toss gently, and serve immediately. 

Yield:  6 servings.

Sunday, October 30, 2011

An Early Snow!

Our pumpkin got a little snow hat!
We were blessed to have dodged the first winter Nor'easter of the year! The forecast called for 3-7" but we only ended up with about 1 inch. Enough to make everything look beautiful but not cause any damage ... and it was almost all gone by noon!


Una, Eli, and Oliver pretending that it is
December, not October!
As an added bonus, I got our Christmas card picture done too! Usually we take it in front of our Christmas tree, but the early snow gave us a new opportunity.

I think they look beautiful - what a blessing!  

Monday, October 17, 2011

Our Little Boy is Growing Up

Stewie the Rooster
Our little rooster, that is!  Stewie is our first rooster and he is just over 4 months old.  I was wondering when he was going to start crowing, and then yesterday he did!  He crowed three times and I haven't heard anything since then.  Guess he was just trying it out!

I first wrote about Stewie in August when we first realized he was a "he."  At the time, he had nipped at me and I was hoping that he wasn't going to be nasty (as many roosters are).  As it turns out, he seems to be a sweetheart.  If anything he is very timid and skittish.  Some of the chickens are more comfortable around us than others, and he is definitely one of the timid ones - he is even jumpy around some of the hens!

He's a good little boy and I hope he stays that way.

Saturday, October 8, 2011

Who knew Swiss Chard tasted so good???

I kept reading about how healthy Swiss Chard was, but to be honest, chard is one of those vegetables that I walk past in the grocery store thinking "what do I do with THAT?" I bought seeds this year but didn't plant them until later in the season because of that same mentality. Finally, I planted them in some pots and they grew! Then every time I walked past the pots I would think, "guess I should do something with that ..." but never got around to it, until tonight.

I've already talked about this great book called The World's Healthiest Foods.  It is fantastic - for each food, the author discusses the healthiest way to prepare it. For Swiss Chard, 3 minutes of boiling is recommended to reduce the bitterness while preserving the vitamins. After boiling, combine with a simple Mediterranean dressing and it is really amazing! Tim loved it and even the kids ate every bite.

Three-Minute Mediterranean Swiss Chard

1 lb Swiss Chard
3 T extra virgin olive oil
1 t lemon juice
1 medium clove garlic, crushed
Sea salt and pepper to taste

  1. To prepare the Swiss Chard:  Stack the leaves on top of each other.  Slice leaves into 1-inch slices and slice white stems into 1/2-inch slices.  Yellow and red stems are tougher and should be discarded.  
  2. Prepare Mediterranean dressing:  combine olive oil, lemon juice, crushed garlic, salt, and pepper.  (The author notes that garlic should be crushed 5-10 minutes before using to get the most health benefits from the garlic.  Read the book to find out why!)
  3. Bring water to a rapid boil.  Boil the Swiss Chard for 3 minutes, then drain.
  4. Toss the dressing with the chard and serve hot.
We were pleasantly surprised by how great this simple yet healthy recipe is.  Can't wait to plant a lot more of it next year!

Friday, October 7, 2011

Eggplant Rolletini

One last eggplant recipe!  We love eggplant parmesan but rolletini is the favorite.  Not as healthy of course, but so, so good!

Post image for The Protected Cultivation of Eggplant1-2 medium eggplant
3 eggs (well beaten in large bowl)
2-3 cups of flour OR breadcrumbs
canola oil (for pan frying)
your favorite tomato sauce
2 cups mozzarella cheese, shredded

8 oz. ricotta cheese
1/4 cup chopped parsley, fresh or dried
black pepper to taste
1/2 cup parmesan or romano cheese, shredded or grated

  1. Peel the eggplant and slice very thin, lengthwise.  (the thinner the better!)
  2. Bread the eggplant slices.  If using flour: first coat in flour, then dip completely in egg, and then dredge again in flour.  If using breadcrumbs:  dip first in egg, then in breadcrumbs.  [I believe that flour is healthier because the breadcrumbs soak up a lot of oil while frying; both are delicious!]
  3. Heat the canola oil in large skillet on fairly high heat.  There should be enough oil to completely cover the skillet and it should be about 1/4" deep.
  4. Fry each eggplant slice in the oil until lightly browned.  As you take them out to put in the next batch, blot them on a paper towel to absorb the excess oil.
  5. Make the cheese filling by combining the ricotta cheese, parsley, black pepper, and 1/4 cup parmesan cheese.  This is a basic filling and you can vary the amounts to taste as you wish.
  6. In a 9"x11" baking dish, lightly coat the bottom with tomato sauce.  Take one slice of eggplant, add a spoonful of filling and fold the slice over.  Continue with the rest of the slices.  Once they are all filled, spoon tomato sauce on each one, then sprinkle with the mozzarella and remaining parmesan cheese. 
  7. Bake in an oven preheated to 350 degrees F until heated through and cheese is melted, about 30 minutes.  Bake for the first 20 minutes with aluminum foil to prevent the cheese from getting overdone.  If you are freezing for future use, you don't need to bake it now - just tightly cover and freeze.  You can bake it later thawed out or frozen (just allow longer baking time if frozen, of course).
Enjoy!

Monday, September 26, 2011

Eggplant Parmesan II

Wow!  I really can't believe how well my eggplant ended up doing this year.  They got off to such a slow start that I feared the cold weather would come before I got many vegetables.  However, I keep getting eggplant even in this not-too-hot but pretty humid weather so I'm very happy.  Two plants in particular that no kidding, I almost pulled them out of my vegetable bed because they weren't doing ANYTHING for so long, have been my best producers!  Those beds are on the south side of my barn which is brown, so I wonder if the location is beneficial - protection from winds coming from the northwest plus radiant heating coming off of the barn wall.

I posted an eggplant parmesan recipe earlier this summer that uses flour for the breading.  Below is a recipe that uses breadcrumbs.  The flour is healthier - I am basing this on the fact that much less oil is needed for frying.  The breadcrumbs really absorb the oil and refills are often needed as you're frying.

However - using breadcrumbs is very tasty!  So here is the recipe again, only with breadcrumbs.

1 medium eggplant
3 eggs (well beaten in large bowl)
2-3 cups of breadcrumbs
canola oil (for pan frying)
your favorite tomato sauce
2 cups mozzarella cheese, shredded
1/2 cup parmesan or romano cheese, shredded or grated

  1. Peel the eggplant and slice very thin.  Usually I slice in "rounds".
  2. Bread the eggplant slices by dipping in egg, and then coat completely in breadcrumbs.
  3. Heat the canola oil in large skillet on fairly high heat.  There should be enough oil to completely cover the skillet and it should be about 1/4" deep.
  4. Fry each eggplant slice in the oil until lightly browned.  As you take them out to put in the next batch, blot them on a paper towel to absorb the excess oil.
  5. In a 9"x11" baking dish, lightly coat the bottom with tomato sauce.  Add the eggplant slices to cover the bottom of the dish (only one layer).  Spoon tomato sauce on each one, then sprinkle with the mozzarella and parmesan cheese.  Add another layer and repeat until all the eggplant is used.  
  6. Bake in an oven preheated to 350 degrees F until heated through and cheese is melted, about 30 minutes.  Bake for the first 20 minutes with aluminum foil to prevent the cheese from getting overdone.  If you are freezing for future use, you don't need to bake it now - just tightly cover and freeze.  You can bake it later thawed out or frozen (just allow longer baking time if frozen, of course).
Enjoy!

Saturday, September 24, 2011

A Tiny Egg!

This morning as I was going out to let the chickens out, I found the tiniest little egg out in the chicken yard!

We have 3 batches of chickens.  Our oldest batch are over a year old and lay normal sized eggs (on the left).  Our second batch are about 5 months old and have just started to lay.  Their eggs are smaller; their eggs will increase in size as they mature.  They are called "pullet eggs."   The third batch is only 3 months old and shouldn't be laying yet ... but then who laid this tiny thing on the right?

I checked over at one of my favorite blogs, BackyardChickens.com, and found that this sometimes happens but the egg is not fully formed.  Sure enough, when I broke it open, there was not a typical yolk inside.  The young pullet probably wasn't expecting this to happen, since the egg was in the middle of the grass and not in a nesting area!

It was a cute little surprise from one of those 4 youngest pullets!  The family cracked up when I showed it to them.  You learn something new every day!


Friday, September 23, 2011

Food Dehydrators

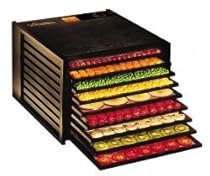
Excalibur 3900 Deluxe Series 9 Tray Food Dehydrator - BlackI'm very excited about my new food dehydrator!  We got the Excalibur 3900 Deluxe -- it is a very serious food dehydrator!  I took a class at our local state cooperative extension and got all revved up to experiment with drying foods.  The benefit of dehydrating food over freezing is that no energy is needed for long-term food preservation, so you don't have to worry about losing your food due to a black-out or freezer failure.  Since our freezer stopped working back in July and I almost lost everything in it (a fully-stocked, large capacity, full-size freezer), I can definitely relate to how devastating that could be. I spent a while researching types and models and finally decided on this one.

I'm no expert, but here's what I learned in my research.  There are two basic types of dehydrators:  those that dry back-to-front, and those that dry from bottom-to-top.  The bottom-to-top types are usually circular and have donut-shaped trays with a hole in the center. Because the blower is located at the bottom of the unit, the bottom trays dry first so you have to rotate the trays around to ensure even drying.  These units are fairly inexpensive.

The back-to-front units have the heater/blower located in the back, so the air blows evenly across all of the trays. Also, these units don't require a hole in the tray so it makes it easier to arrange the food. This comes in handy if you want to make fruit leathers (basically it's a fruit roll-up, without all the added junky ingredients!).

I have found the Excalibur 3900 to be great so far. It has 9 trays. They also make a model called the 3500 with only 5 trays, which might have been a better choice for the majority of my drying needs. The 3900 uses more electricity so if it is not full, you aren't getting the full benefit.  However, it was completely full when we made venison jerky so the 9 trays came in very handy that day.

So far, I've made "sun-dried" tomatoes and venison jerky.  I plan to make dried apple rings very soon as a very tasty and healthy snack for my kids.  I am also psyched to make some fruit leathers ... my older kids will be very excited about these!

Thursday, September 22, 2011

Tim's "Famous" Apple Cobbler

We are blessed with a wonderful apple tree and it's that time of year!  My husband makes a great apple pie, but my favorite is his apple cobbler.  It's a little more work but very much worth the time!  I will post the recipe now and update later with a picture ... we ate the last one before I remembered to take a picture!

Tim and Una making apple cobbler - Una loves to
help in the kitchen (well, the cooking part,
not so much with the cleaning up!)
Apple Cobbler

4 cups sliced, peeled apples
1-1/3 cups sugar
1/8 teaspoon cinnamon
1/2 teaspoon almond extract (this is the secret ingredient that makes it so YUMMY!)
6 T butter
1-1/2 cups flour
3 teaspoons baking powder
1/2 teaspoon salt
1 egg, beaten
2/3 cup milk

Preheat oven to 425 degrees.  Place apples in a 1-1/2 quart baking dish.  Sprinkle apples with 1 cup sugar, cinnamon, and almond extract; dot with 2T butter.  Mix flour, baking powder, 1/3 cup sugar, and salt together in large bowl.  Cut in 4T butter until mixture is slightly coarser than cornmeal.  Combine egg and milk in separate bowl; pour into flour mixture.  Stir just enough to combine and spoon over apples in baking dish.  Bake for 30 minutes, until browned.  Serve alone or with whipped cream, sour cream, or ice cream.

(We call this Tim's Famous Apple Cobbler but it's from an old cookbook called Creative Cooking:  Desserts dated 1992.  It has some great recipes - simple and delicious!)

Friday, August 12, 2011

pickles, Pickles, PICKLES!!!

From talking with some of my friends, it's clear that this year is a good one for cucumbers!  This is my first year making pickles and I've tried a number of recipes.  I canned the batch I made today, but all the rest were "refrigerator pickles" - just put them in the fridge and they'll keep for a couple of months.

  • First I tried the basic dill pickle seasoning from Ball.  It was very good.  Using a seasoning packet makes things easier - all you do is boil water and vinegar, add the seasoning, and pour into your jars of cucumbers.
  • I made a Sweet Garlic Dill recipe from The Complete Book of Small Batch Preserving.  Honestly, I don't know why I made this one!  We don't like sweet pickles.  I guess I thought the garlic and dill would overpower the sweet, but they still tasted too much like bread and butter pickles to me. (blech!) Luckily, I found out that my neighbor loves sweet pickles so I gave her a couple of jars ... and then I made her a huge batch with cucumbers she had been given by another neighbor, so her sweet pickle craving has been fed!)  Making pickles from scratch as in this recipe is a bit more work but really quite simple.  You just have to measure out all of the individual spices.
  • Next I tried a recipe from the same book called Favorite Dill Pickles.  This one is awesome!  These taste like authentic deli pickles.  When we first tried them (about a week after I made them) they were still a little bit sharp from the vinegar, but a couple of weeks later they are perfect!  Definitely worth the wait.
  • Finally I tried another seasonings packet by a brand called Mrs. Wages.  It had gotten great reviews from a few websites, but honestly, we thought the Ball seasoning packet was better. 

This afternoon I made another batch of the Favorite Dill Pickles, plus a batch of Tangy Dill Pickle Relish.  Usually I don't like relish because it is too sweet, but this recipe uses lots of dill and garlic and is very good.  I can't wait to try some at our next barbeque!

Making these recipes was cool because not only were the cucumbers home-grown, so were the onions and the dill!  

Spawn of Crazy Chicken!

Looking down into the brooder - you can see
Crazy Chicken in her time-out corner!
A quick story.  Last year when we ordered our first batch of 12 chicks, I ordered two Salmon Faverolles.  They are a bit different from most breeds of chickens because they have muffs on their cheeks, feathered legs, and 5 toes instead of 4.  They are also supposed to be pretty shy, docile, and easy to take care of.  Unfortunately, one of the babies arrived very weak and died a couple of days later.  The other one seemed fine at first, but after a few days, she started beating up on the other chicks!  Literally poking at their eyes, and she drew blood on one chick.  The recommended approach for a naughty chick is to isolate it within the brooder for a while - kind of a "time-out" corner!  Well, I tried that and it didn't work. I ended up trading her for another chick from a friend of mine who had a batch of chicks that were older. We thought that if she were with bigger chicks, she wouldn't be able to beat up on them (for one thing, they could fly and she couldn't!).  It worked and she kept the bird.  She still had a weird personality and they called her Sammy, the Crazy Chicken.

Fast-forward to this year ... I mentioned in a previous post that my favorite hen named Hickety went broody this spring and wanted to hatch out chicks.  We don't have a rooster so I got some fertilized eggs from this same friend ... and it looks like Crazy Chicken was the mom of one of our babies!  I was pretty excited this morning when I realized that ... I kept looking at this chicken and trying to figure out why she looked familiar to me ... then I realized that she looks just like a Salmon Faverolle!  She has the right coloring, the side muffs, the feathered legs, and yes, she has 5 toes!
This is a typical Salmon Faverolle
The pullet on the right is the Spawn of Crazy Chicken!
This was the best picture I could get of her because she kept running away ...

It's funny too, because this chicken is definitely "weird."  She hides a lot and won't let anyone near her ... same thing her mom did over at my friend's farm.  We decided to name her Hedwig because she kind of reminds me of the snowy owl from Harry Potter.

I'm also glad that we got one of Sammy's babies because she was killed by a fox a few weeks ago :-(.  My friend has a few of her babies too, so her memory will live on!

Thursday, August 11, 2011

My Christmas Gift

I got the BEST Christmas gift last year from Tim and the kids!  They hunted around all of the antique stores in our town (there are quite a few of them) and found this!
What woman wouldn't LOVE a rooster weathervane?!?  Tim snuck it into the house and wrapped it to drive me crazy since it was such a funny shape.  Una, who is a TERRIBLE gift secret-keeper, let it slip to me that it was "something to do with chickens" but I still didn't know what it was.  I was so surprised and I just loved it ... but we didn't get to install it until July.  Now, every time I walk outside, I am reminded of what a thoughtful hubby and kids I have!

Wednesday, August 10, 2011

Reducing your household waste

When we got chickens last year, I was so happy that our leftover or scrap food could be fed to them.  I really hate wasting food, and I didn't realize just how much food was routinely thrown out until we started saving the leftovers for them.  (Mind you - we eat leftovers for lunch during the week, so I am talking more about scraps).

Composting was another challenge.  Over the years, we had tried to be true to composting uncooked kitchen waste.  We bought the cute ceramic container that is supposed to make it so convenient to compost.  It ended up not getting dumped often enough (yuck!) and then one day one of the ceramic knobs broke off. We tried different types of containers but nothing really "stuck."  Usually each spring, we would compost for about 1-2 months and then give up.

This year was different.  We did a couple of things to keep us motivated - maybe some of these ideas will help you too!

  • First, we moved the compost pile closer to "home."  We used to have one large pile out in one of our back fields and it was a good 8 minute trek round-trip.  Now we have three smaller bins right near the chicken coop.  Since we walk out to the coop a few times each day anyway, it is no big deal to take the compost out.
  • I keep two small containers in one of the wells of my kitchen sink - one for the chickens, and one for the compost.  They are open so that I can see what is inside and they get emptied when they are full or have been there a while.  The rule is they get emptied at least once a day!  Nothing is left there overnight.  This keeps the grossness factor way down!
Here is a list of things that you can typically put in your compost pile from the kitchen:
  • fruit/vegetable peelings
  • coffee grounds
  • tea bags
  • overripe fruits and vegetables
This compares to what you might give to your chickens:
  • leftover raw or cooked vegetables or fruits
  • dairy - yogurt, cream cheese, sour cream, etc.
  • breads
  • cooked meat - beef, pork, fish, chicken (yes, it sounds gross, but they love meat ...)
You can see that between the two bins, hardly any food is thrown away!  There are a few things that you shouldn't feed chickens - onions and peppers (strong flavors might affect the taste of the eggs) and avocados (makes them VERY sick), to name a few.  They also don't usually like citrus fruits, but maybe there are some chickens out there who do.

When there is something from the kitchen that could go in either bin, I always choose the chickens, since it has a more direct benefit to me.  Feeding them kitchen scraps lowers the amount of commercial food that they eat, which helps to save money!

It's funny ... because now that we have greatly reduced the amount of unused waste from our kitchen, I am struck when I am visiting other people's houses at how much is thrown away.  I can't help but think "if only my chickens were here!" 

Tuesday, August 9, 2011

Creamed Cucumbers

We have had a great cucumber harvest this year.  We planted 6 pickling cucumber plants and 2 seedless cucumbers plants.  I love a basic tomato-cucumber-red onion salad, but THIS recipe is my new favorite for those seedless cucumbers.  Try it!  It is from www.allrecipes.com, with a few small modifications.


Creamed Cucumbers

Ingredients
  • 5 cucumbers, peeled and thinly sliced
  • 1 bunch green onions with tops, chopped
  • 1 cup mayonnaise
  • 1/4 cup milk
  • 1/4 cup lemon juice or white vinegar
  • 1/4 cup sugar
  • 2 drops hot pepper sauce
  • 1 teaspoon dried parsley flakes (or 1-2 T fresh)
  • 1/4 teaspoon pepper
  • 1/4 teaspoon garlic powder
  • 1/4 teaspoon onion powder

Directions

  1. Combine cucumbers and green onions in a large bowl. Cover and let stand for 1 hour. Combine all remaining ingredients; pour over cucumber mixture and mix well. Refrigerate for several hours.


Monday, August 8, 2011

It's a Boy!


Meet Stewie
At least, I'm pretty sure he's a he.  My favorite hen, Hickety, is an Australorp who keeps going broody (meaning she wants to hatch out chicks).  Since we don't have a rooster, that just wasn't going to happen!  A friend of mine gave me some fertilized eggs to set underneath her.  Hickety hatched out 5 babies in June and was a great mama hen to her babies.

So when you hatch eggs, you get a straight run - some male, some female.  Out of the 5, I think one at least is a cockerel.  He is huge compared to the other babies, and I'm pretty sure I can see the beginning of the spurs that they get.  I found out yesterday that he's got a pretty good bite to him already, too.  My prediction is that he ends up in a pot by the end of the year!

We named him Stewie (after the obnoxious baby in Family Guy) but as I'm typing this, I see that the name is also very likely his destiny. Now that's funny!

Check out these rain barrels!

Hooray!  We finally have our rain barrels installed. Commercial rain barrels can be really expensive - $150 each, or even more. We made our own using food-grade barrels that I got from a restaurant (they used to contain crushed tomatoes!). They are 55 gallons each and we have two sets of two linked together. We have a set next to the raised vegetable beds and a set by the chicken coop. We use them for drinking water for the chickens, to water the vegetables, and also to keep the compost piles moist. There is a screen over the one open barrel below the gutter to keep the mosquitoes out and there is an overflow at the top of the closed barrel.  They work great and I am so happy that we have them.  It is amazing how much water is wasted in a soaking rain!  These barrels fill up completely in about 5 minutes if there is a good downpour (typical of the summer thunderstorms that we get).  The only thing that we would have done differently is put a larger diameter spigot at the bottom. We used the typical diameter hose, but we should have used bigger to get a faster flow rate.  It's not a big deal, but if we build any more we will definitely use the bigger size.

Zucchini Pie

This recipe was a real find!  I have to admit that although zucchini is a staple in the vegetable garden, I have never been really crazy about it.  I don't like it cooked!  I don't mind it raw but it's hard to get through all that zucchini if you're just slicing it and eating it raw.

So I found a recipe for Zucchini Pie at allrecipes.com, one of my most favorite websites.  I have modified it to make it healthier and to use up more zucchini!  If you don't like zucchini (or have friends or family who don't), I guarantee that they will LOVE this pie!  I have served it to many people so far this summer, and almost every time I get asked for the recipe!  This recipe makes two pies, so eat one now and freeze the other for later!

2 9" unbaked pie crusts (ready-made graham cracker crust works great too)
4 c. zucchini (this is equivalent to one large or two smaller zucchini (peeled and cubed)
2 c. white sugar
3 eggs
3 T flour
1/2 c. butter, melted
1 1/2 t vanilla extract
1T cinnamon

Topping (for two pies)
1 c. flour
1 c. brown sugar
6 T butter, softened


  1. Preheat oven to 350 degrees F.  Line 9-inch pie dishes with pie crust.
  2. Puree the zucchini and transfer to a bowl.  Whisk with eggs, sugar, butter, vanilla extract, and cinnamon.  Pour the mixture evenly into the two pie crusts.
  3. In a separate bowl make the topping.  Cut the softened butter with the brown sugar and flour to make coarse crumbs.  Sprinkle evenly over the pie filling.
  4. Bake until filling is set and topping is lightly browned, about 1 hour.  Allow to cool for at least 30 minutes before serving.


Eggplant Parmesan

Wow - we finally got our first eggplant!  My husband and I have been craving eggplant but they got off to a very slow start this year.  We finally got a span of hot, dry weather and the plants are thriving.  Last year was incredible - we were completely overrun and I had trouble keeping up with them.

Many people don't know what to do with eggplant, so here is my basic Eggplant Parmesan recipe:

1 medium eggplant
3 eggs (well beaten in large bowl)
2-3 cups of flour
canola oil (for pan frying)
your favorite tomato sauce
2 cups mozzarella cheese, shredded
1/2 cup parmesan or romano cheese, shredded or grated


  1. Peel the eggplant and slice very thin.  Usually I slice in "rounds", but today I sliced lengthwise instead.
  2. Bread the eggplant slices by coating first in flour, then dip completely in egg, and then dredge again in flour.
  3. Heat the canola oil in large skillet on fairly high heat.  There should be enough oil to completely cover the skillet and it should be about 1/4" deep.
  4. Fry each eggplant slice in the oil until lightly browned.  As you take them out to put in the next batch, blot them on a paper towel to absorb the excess oil.
  5. In a 9"x11" baking dish, lightly coat the bottom with tomato sauce.  Add the eggplant slices to cover the bottom of the dish (only one layer).  Spoon tomato sauce on each one, then sprinkle with the mozzarella and parmesan cheese.  Add another layer and repeat until all the eggplant is used.  
  6. Variation to Step 5:  if you used lengthwise slices (instead of rounds), this is a fancier way to do it:  starting from one end of the dish, take one eggplant slice and gently fold in half.  Add some tomato sauce inside with a bit of mozzarella cheese, then do the same on the outside.  Take the next piece and do the same: fold it in half and layer against the first piece, adding tomato sauce and mozzarella cheese inside the fold and then again on top.  Repeat with all of the slices (you will probably need two rows of eggplant in the dish).  Sprinkle the whole thing with parmesan cheese.
  7. Bake in an oven preheated to 350 degrees F until heated through and cheese is melted, about 30 minutes.  Bake for the first 20 minutes with aluminum foil to prevent the cheese from getting overdone.  If you are freezing for future use, you don't need to bake it now - just tightly cover and freeze.  You can bake it later thawed out or frozen (just allow longer baking time if frozen, of course).
Enjoy!

Basil Pesto

Yum, I made my first batch of basil pesto for this year!
There's more where that came from!


"That's allotta basil!"
(in our best Italian accent)
Last year, I made lots of pesto all summer long.  Then at the end of the summer, we just pulled out the plants and brought them into the house.  There were only two of them but they were huge!  I enlisted my family to help me pick off all of the leaves ... it took over an hour with four of us working at it.  I froze all of the pesto and I am just now using up my last container, so this new batch is just in time!

Here is my basic recipe:
4 cups basil leaves
1 cup olive oil
2/3 cup parmesan cheese
4 large cloves garlic
freshly ground black pepper to taste

This is the general recipe and I kind of go from there.  When I go to use it, I add more olive oil.  Authentic Italian basil pesto has pine nuts, but I don't care for them so I leave them out.


Sunday, August 7, 2011

Raising chickens is really easy!

"Before"
Last year we decided to get chickens.  We had an old chicken coop on our property - it hadn't been used in probably over 25 years.  It is a very large building, as far as chicken coops go.  We installed new siding over the old siding, replaced some floorboards on the second floor, and dug out quite a bit of old "organic matter" from the first floor.  It was about 1 foot deep with old corn cobs, hay, dirt, and rocks. We predator-proofed the place (we hope) by installing wire screening all along the bottom perimeter.  The bottom edge of the screening is buried about 6 inches deep in concrete.  Then we painted the whole first floor to give it a brighter, cleaner look.  Love it!

New Siding
Up until this point, we were basically just cleaning up an old structure on our property - we could have used it for lots of different things.  Actually, my husband suggested to me a couple of times that just because we were fixing up the coop, it didn't mean that we actually had to get some chickens!  I will admit that I was the one who was gung-ho about getting the chickens - I just loved the idea of having our own farm-fresh eggs.

Roosting bar with droppings board
 The next steps were the chicken-specific modifications.  The inside dimensions of the coop are 22' x 15'.  The chickens' living area is 16' x 15', and the remainder is the entry way, stairs to 2nd floor, and storage space.  DH built a great roost with a droppings board below for easy cleanup.  He also built nesting boxes with access from the rear to collect the eggs.  It was funny that he wasn't too keen about getting the chickens, because as he was designing these things, he built them for twice as many chickens as we have because "next year we'll probably get some more!"


Nesting boxes
Most of the ideas for our roost, droppings board, and nesting boxes came from the "Chicken Forum" at www.backyardchickens.com.  This is a great website and if you are thinking about getting into chickens (or even if you've got them already), you should check it out.  They are a wealth of knowledge and you'll find everything you need to know!

Yes, the baby chicks arrive through the mail in a box!
Neither one of us had ever even come in close contact with a chicken before, but we went ahead and ordered our baby chicks.  It turns out that it really is quite easy to take care of chickens.  They're great pets (yes, all of ours have names) - they provide food, eat excess kitchen scraps, and one day, they'll end up in the pot!


The coop today - with enclosed run and larger fenced-in chicken pasture


An Introduction.

My husband and I live in Upstate NY with our three children.  Ours is an old house, built in 1775, with 12 acres of land.  When we were house-hunting 15 years ago, I wanted a big house for large family gatherings and visits from the grandchildren you know (talk about long-range planning!) and my DH wanted land for hunting ... and so we purchased our property which met both requirements.  As the years have gone by, I have developed another passion, and that is for self-sustaining living.

Why?  Many people wonder about that (mostly my family!).

Well, for a lot of reasons.  I have always been the kind of person who loves "living off the land."  That used to mean camping, fishing, and hunting, all pastimes that DH and I did a lot of early on.  I think that as I've gotten older, I realize that there was a reason that our ancestors settled down from "hunter-gatherer" to farming!  A properly run homestead is more reliable and stable than depending upon just fishing and hunting.  We dabbled with vegetable gardening for a couple of years and then last year (2010) we started to get more serious.  We had a kick-butt vegetable garden and I started to learn about the best ways to preserve food ... and we also got our first chickens!  This year we've expanded the vegetable garden, gotten more serious about composting, installed 4 rain barrels for watering the chickens, compost, and gardens, and plan to experiment with root cellaring this fall and winter.  Later posts will expand upon all of these topics and more.
Related Posts Plugin for WordPress, Blogger...