About this site

Welcome! I created this site to share what we've done, talk about what we plan to do, and exchange ideas with other folks who are on the same path as us. Join us in the fun of living at Chickaree Hill Farm!

Monday, October 17, 2011

Our Little Boy is Growing Up

Stewie the Rooster
Our little rooster, that is!  Stewie is our first rooster and he is just over 4 months old.  I was wondering when he was going to start crowing, and then yesterday he did!  He crowed three times and I haven't heard anything since then.  Guess he was just trying it out!

I first wrote about Stewie in August when we first realized he was a "he."  At the time, he had nipped at me and I was hoping that he wasn't going to be nasty (as many roosters are).  As it turns out, he seems to be a sweetheart.  If anything he is very timid and skittish.  Some of the chickens are more comfortable around us than others, and he is definitely one of the timid ones - he is even jumpy around some of the hens!

He's a good little boy and I hope he stays that way.

Saturday, October 8, 2011

Who knew Swiss Chard tasted so good???

I kept reading about how healthy Swiss Chard was, but to be honest, chard is one of those vegetables that I walk past in the grocery store thinking "what do I do with THAT?" I bought seeds this year but didn't plant them until later in the season because of that same mentality. Finally, I planted them in some pots and they grew! Then every time I walked past the pots I would think, "guess I should do something with that ..." but never got around to it, until tonight.

I've already talked about this great book called The World's Healthiest Foods.  It is fantastic - for each food, the author discusses the healthiest way to prepare it. For Swiss Chard, 3 minutes of boiling is recommended to reduce the bitterness while preserving the vitamins. After boiling, combine with a simple Mediterranean dressing and it is really amazing! Tim loved it and even the kids ate every bite.

Three-Minute Mediterranean Swiss Chard

1 lb Swiss Chard
3 T extra virgin olive oil
1 t lemon juice
1 medium clove garlic, crushed
Sea salt and pepper to taste

  1. To prepare the Swiss Chard:  Stack the leaves on top of each other.  Slice leaves into 1-inch slices and slice white stems into 1/2-inch slices.  Yellow and red stems are tougher and should be discarded.  
  2. Prepare Mediterranean dressing:  combine olive oil, lemon juice, crushed garlic, salt, and pepper.  (The author notes that garlic should be crushed 5-10 minutes before using to get the most health benefits from the garlic.  Read the book to find out why!)
  3. Bring water to a rapid boil.  Boil the Swiss Chard for 3 minutes, then drain.
  4. Toss the dressing with the chard and serve hot.
We were pleasantly surprised by how great this simple yet healthy recipe is.  Can't wait to plant a lot more of it next year!

Friday, October 7, 2011

Eggplant Rolletini

One last eggplant recipe!  We love eggplant parmesan but rolletini is the favorite.  Not as healthy of course, but so, so good!

Post image for The Protected Cultivation of Eggplant1-2 medium eggplant
3 eggs (well beaten in large bowl)
2-3 cups of flour OR breadcrumbs
canola oil (for pan frying)
your favorite tomato sauce
2 cups mozzarella cheese, shredded

8 oz. ricotta cheese
1/4 cup chopped parsley, fresh or dried
black pepper to taste
1/2 cup parmesan or romano cheese, shredded or grated

  1. Peel the eggplant and slice very thin, lengthwise.  (the thinner the better!)
  2. Bread the eggplant slices.  If using flour: first coat in flour, then dip completely in egg, and then dredge again in flour.  If using breadcrumbs:  dip first in egg, then in breadcrumbs.  [I believe that flour is healthier because the breadcrumbs soak up a lot of oil while frying; both are delicious!]
  3. Heat the canola oil in large skillet on fairly high heat.  There should be enough oil to completely cover the skillet and it should be about 1/4" deep.
  4. Fry each eggplant slice in the oil until lightly browned.  As you take them out to put in the next batch, blot them on a paper towel to absorb the excess oil.
  5. Make the cheese filling by combining the ricotta cheese, parsley, black pepper, and 1/4 cup parmesan cheese.  This is a basic filling and you can vary the amounts to taste as you wish.
  6. In a 9"x11" baking dish, lightly coat the bottom with tomato sauce.  Take one slice of eggplant, add a spoonful of filling and fold the slice over.  Continue with the rest of the slices.  Once they are all filled, spoon tomato sauce on each one, then sprinkle with the mozzarella and remaining parmesan cheese. 
  7. Bake in an oven preheated to 350 degrees F until heated through and cheese is melted, about 30 minutes.  Bake for the first 20 minutes with aluminum foil to prevent the cheese from getting overdone.  If you are freezing for future use, you don't need to bake it now - just tightly cover and freeze.  You can bake it later thawed out or frozen (just allow longer baking time if frozen, of course).
Enjoy!

Monday, September 26, 2011

Eggplant Parmesan II

Wow!  I really can't believe how well my eggplant ended up doing this year.  They got off to such a slow start that I feared the cold weather would come before I got many vegetables.  However, I keep getting eggplant even in this not-too-hot but pretty humid weather so I'm very happy.  Two plants in particular that no kidding, I almost pulled them out of my vegetable bed because they weren't doing ANYTHING for so long, have been my best producers!  Those beds are on the south side of my barn which is brown, so I wonder if the location is beneficial - protection from winds coming from the northwest plus radiant heating coming off of the barn wall.

I posted an eggplant parmesan recipe earlier this summer that uses flour for the breading.  Below is a recipe that uses breadcrumbs.  The flour is healthier - I am basing this on the fact that much less oil is needed for frying.  The breadcrumbs really absorb the oil and refills are often needed as you're frying.

However - using breadcrumbs is very tasty!  So here is the recipe again, only with breadcrumbs.

1 medium eggplant
3 eggs (well beaten in large bowl)
2-3 cups of breadcrumbs
canola oil (for pan frying)
your favorite tomato sauce
2 cups mozzarella cheese, shredded
1/2 cup parmesan or romano cheese, shredded or grated

  1. Peel the eggplant and slice very thin.  Usually I slice in "rounds".
  2. Bread the eggplant slices by dipping in egg, and then coat completely in breadcrumbs.
  3. Heat the canola oil in large skillet on fairly high heat.  There should be enough oil to completely cover the skillet and it should be about 1/4" deep.
  4. Fry each eggplant slice in the oil until lightly browned.  As you take them out to put in the next batch, blot them on a paper towel to absorb the excess oil.
  5. In a 9"x11" baking dish, lightly coat the bottom with tomato sauce.  Add the eggplant slices to cover the bottom of the dish (only one layer).  Spoon tomato sauce on each one, then sprinkle with the mozzarella and parmesan cheese.  Add another layer and repeat until all the eggplant is used.  
  6. Bake in an oven preheated to 350 degrees F until heated through and cheese is melted, about 30 minutes.  Bake for the first 20 minutes with aluminum foil to prevent the cheese from getting overdone.  If you are freezing for future use, you don't need to bake it now - just tightly cover and freeze.  You can bake it later thawed out or frozen (just allow longer baking time if frozen, of course).
Enjoy!

Saturday, September 24, 2011

A Tiny Egg!

This morning as I was going out to let the chickens out, I found the tiniest little egg out in the chicken yard!

We have 3 batches of chickens.  Our oldest batch are over a year old and lay normal sized eggs (on the left).  Our second batch are about 5 months old and have just started to lay.  Their eggs are smaller; their eggs will increase in size as they mature.  They are called "pullet eggs."   The third batch is only 3 months old and shouldn't be laying yet ... but then who laid this tiny thing on the right?

I checked over at one of my favorite blogs, BackyardChickens.com, and found that this sometimes happens but the egg is not fully formed.  Sure enough, when I broke it open, there was not a typical yolk inside.  The young pullet probably wasn't expecting this to happen, since the egg was in the middle of the grass and not in a nesting area!

It was a cute little surprise from one of those 4 youngest pullets!  The family cracked up when I showed it to them.  You learn something new every day!


Friday, September 23, 2011

Food Dehydrators

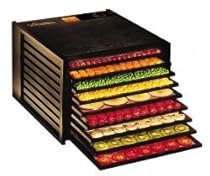
Excalibur 3900 Deluxe Series 9 Tray Food Dehydrator - BlackI'm very excited about my new food dehydrator!  We got the Excalibur 3900 Deluxe -- it is a very serious food dehydrator!  I took a class at our local state cooperative extension and got all revved up to experiment with drying foods.  The benefit of dehydrating food over freezing is that no energy is needed for long-term food preservation, so you don't have to worry about losing your food due to a black-out or freezer failure.  Since our freezer stopped working back in July and I almost lost everything in it (a fully-stocked, large capacity, full-size freezer), I can definitely relate to how devastating that could be. I spent a while researching types and models and finally decided on this one.

I'm no expert, but here's what I learned in my research.  There are two basic types of dehydrators:  those that dry back-to-front, and those that dry from bottom-to-top.  The bottom-to-top types are usually circular and have donut-shaped trays with a hole in the center. Because the blower is located at the bottom of the unit, the bottom trays dry first so you have to rotate the trays around to ensure even drying.  These units are fairly inexpensive.

The back-to-front units have the heater/blower located in the back, so the air blows evenly across all of the trays. Also, these units don't require a hole in the tray so it makes it easier to arrange the food. This comes in handy if you want to make fruit leathers (basically it's a fruit roll-up, without all the added junky ingredients!).

I have found the Excalibur 3900 to be great so far. It has 9 trays. They also make a model called the 3500 with only 5 trays, which might have been a better choice for the majority of my drying needs. The 3900 uses more electricity so if it is not full, you aren't getting the full benefit.  However, it was completely full when we made venison jerky so the 9 trays came in very handy that day.

So far, I've made "sun-dried" tomatoes and venison jerky.  I plan to make dried apple rings very soon as a very tasty and healthy snack for my kids.  I am also psyched to make some fruit leathers ... my older kids will be very excited about these!

Thursday, September 22, 2011

Tim's "Famous" Apple Cobbler

We are blessed with a wonderful apple tree and it's that time of year!  My husband makes a great apple pie, but my favorite is his apple cobbler.  It's a little more work but very much worth the time!  I will post the recipe now and update later with a picture ... we ate the last one before I remembered to take a picture!

Tim and Una making apple cobbler - Una loves to
help in the kitchen (well, the cooking part,
not so much with the cleaning up!)
Apple Cobbler

4 cups sliced, peeled apples
1-1/3 cups sugar
1/8 teaspoon cinnamon
1/2 teaspoon almond extract (this is the secret ingredient that makes it so YUMMY!)
6 T butter
1-1/2 cups flour
3 teaspoons baking powder
1/2 teaspoon salt
1 egg, beaten
2/3 cup milk

Preheat oven to 425 degrees.  Place apples in a 1-1/2 quart baking dish.  Sprinkle apples with 1 cup sugar, cinnamon, and almond extract; dot with 2T butter.  Mix flour, baking powder, 1/3 cup sugar, and salt together in large bowl.  Cut in 4T butter until mixture is slightly coarser than cornmeal.  Combine egg and milk in separate bowl; pour into flour mixture.  Stir just enough to combine and spoon over apples in baking dish.  Bake for 30 minutes, until browned.  Serve alone or with whipped cream, sour cream, or ice cream.

(We call this Tim's Famous Apple Cobbler but it's from an old cookbook called Creative Cooking:  Desserts dated 1992.  It has some great recipes - simple and delicious!)
Related Posts Plugin for WordPress, Blogger...